Search or browse all guides
Quick visual guide
Choose your client in Settings and copy only its shown setup steps.
- 1
Open Integrations
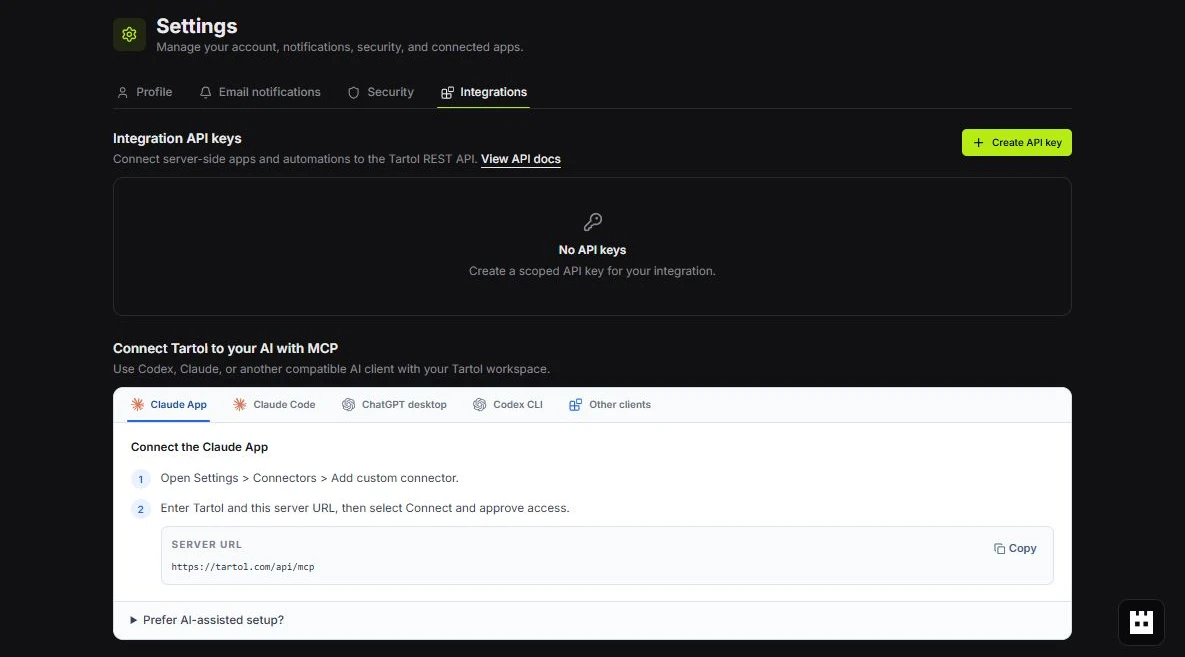
Go to Settings > Integrations, then find Connect Tartol to your AI with MCP.
 MCP setup
 - 2
Choose your client
Select Claude App, Claude Code, ChatGPT desktop, Codex CLI, or Other clients.
Choose a client - 3
Copy the exact URL
Use Copy beside the displayed server URL, then approve access in the client.
Copy
Red labels show the exact control to use.
Detailed referenceOpen this for definitions, limits, examples, and troubleshooting.
Before you connect
The setup guide at /mcp is public and can be read without signing in. Authorizing or managing a connection requires sign-in and an eligible workspace.
- Use an active Creator, Pro, or Agency workspace.
- Choose a trusted client that supports remote Streamable HTTP MCP.
- Be ready to choose one workspace or all eligible workspaces and approve access.
Choose your AI client
Select the client you use and follow its native setup. These are the same instructions shown in Settings > Integrations, including the exact server URL or commands to copy.
Connect the Claude App
- 1
Open Settings > Connectors > Add custom connector.
- 2
Enter Tartol and this server URL, then select Connect and approve access.
Server URLhttps://tartol.com/api/mcp
Prefer AI-assisted setup?
Use this only when your AI client can manage its own MCP settings. Native setup above is more reliable.
Connect this AI client to Tartol using its native MCP and OAuth flow. Configure a Streamable HTTP server named Tartol.

MCP server URL: https://tartol.com/api/mcp

Use OAuth discovery automatically; do not ask for or add an API key, bearer token, resource override, or custom authorization header. Start the client's OAuth action and open the authorization screen so I can sign in, select my workspace, review permissions, and approve. If the request expires, restart OAuth and reopen it. After approval, confirm that the Tartol server is connected, call whoami and list_capabilities, then list the available Tartol tools. Do not modify or deploy Tartol code.Verify the right workspaces
The whoami tool returns every authorized workspace, its role, and the OAuth scopes bound to the connection. Tools accept workspace_id when the client needs to target a specific workspace. Stop and reconnect if any of those are wrong.
Stay connected across restarts
A client restart should not require another Tartol sign-in. Tartol issues a revocable 30-day access session and, when the client registers refresh support, a rotating refresh token valid for up to one year. If a client unexpectedly shows Authenticate again, complete OAuth once, verify the Tartol server is connected, and update or report the client if the problem repeats. Revoking the connection in Tartol immediately prevents the credential from being used again.
Disconnect later
Open Settings > Integrations > OAuth connections and revoke the client. Connections are shown five at a time; use the numbered pagination controls to move between pages. Revocation stops that connection without changing your Tartol password.